Record internal audio on Mac in one click
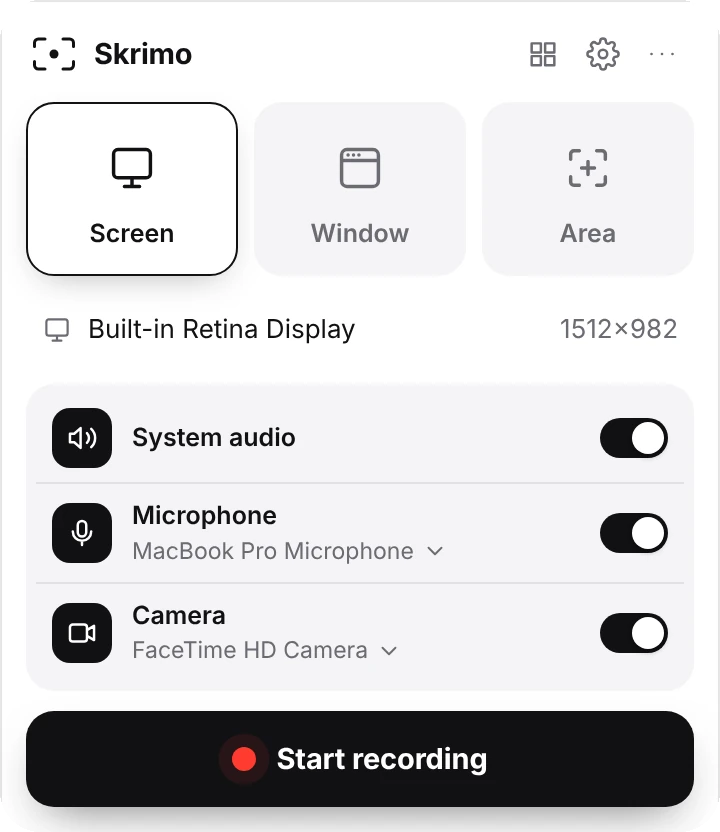
macOS can’t record internal audio with its built-in tools. Skrimo can: switch on System audio in the menu bar panel, press Start recording, and the sound your Mac plays is saved with your screen, on its own track next to your microphone. No BlackHole, no Audio MIDI Setup.
Skrimo is a free mac screen recorder that records internal audio, your microphone and webcam, then adds automatic zoom and a polished frame.
Why macOS can’t record internal audio by itself
Internal audio (system audio, computer audio, desktop audio) is everything your Mac plays: a video, a call, a product’s notification sound, music. Your microphone is different; it records the room.
macOS doesn’t give its built-in recorders access to that internal sound. Press Shift-Command-5 or use QuickTime Player and you can choose a microphone, but not “the Mac itself”. Apple added a way for apps to capture system audio in macOS 13 Ventura, through ScreenCaptureKit, but the built-in recording tools still don’t offer it. That’s why so many people end up with silent screen recordings.
The old workarounds: BlackHole and Soundflower
For years the standard answer to “how do I capture internal audio on Mac” was a virtual audio driver. Soundflower was the classic choice; today it’s usually BlackHole (free) or Loopback (paid). The recipe: install the driver, open Audio MIDI Setup, build a Multi-Output Device that sends sound to both your speakers and BlackHole, make it your Mac’s output, then select BlackHole as QuickTime’s microphone.
It works, but it’s fiddly. Your volume keys stop controlling the multi-output device, you have to switch your output back afterwards, and recording your voice at the same time needs yet another aggregate device. It’s easy to get a recording with no sound after all.
How to record system audio on Mac with Skrimo
- Install Skrimo and open it. It lives in your menu bar.
- The first time, click Allow next to Screen Recording and switch Skrimo on in System Settings → Privacy & Security → Screen Recording. Screen and system audio capture use this one permission.
- Click the menu bar icon, choose Screen, Window or Area, and switch on System audio. Turn on Microphone too if you want to narrate.
- Press Start recording. Play whatever you need to capture; you’ll hear it normally through your speakers or headphones.
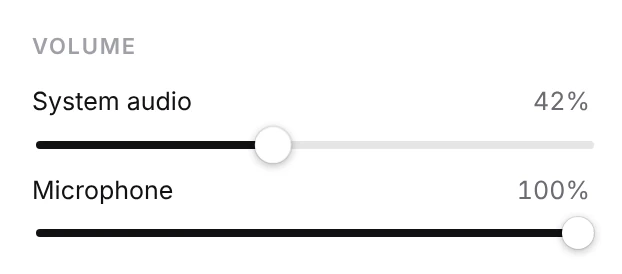
- Press Stop. In the editor, adjust the system audio and microphone volume separately, then export an MP4.
Record Mac screen with internal audio and your voice
Most recordings need both: the sound of the app and your explanation. Skrimo saves system audio and your microphone as separate tracks, so nothing is baked in while you record. In the editor, turn a loud app down under your voice, or mute it entirely, before you export one mixed MP4.
If you record with speakers instead of headphones, your microphone also picks up the Mac’s sound from the room. Headphones give the cleanest result.
Screen record with sound on Mac: troubleshooting
If macOS’s capture service isn’t available on your Mac, Skrimo still records your screen and tells you clearly that this recording has no computer sound, instead of failing silently.
- No sound at all: check System audio was switched on before you pressed Start recording.
- Permission: Skrimo must be allowed under Screen Recording in System Settings. System audio is captured with the screen, so it needs this permission.
- macOS version: system audio capture needs macOS 13 Ventura or later.
- The app is muted, or its sound goes only to an external audio interface with its own routing.
- Protected content, such as DRM-protected streaming video, may be captured silent or black by design.
Recording calls and webinars
Internal audio capture records the other side of a call, so make sure everyone knows they’re being recorded and that it’s allowed where you are. Turn on your microphone too, so your side of the conversation is in the recording.
Frequently asked questions
How do I record internal audio on a Mac?
Use a recorder that captures system audio directly. In Skrimo, switch on System audio in the menu bar panel and press Start recording. No virtual driver is needed on macOS 13 Ventura or later.
Can I capture internal audio on Mac without BlackHole?
Yes. Apps that use Apple’s ScreenCaptureKit, like Skrimo, capture system audio directly on macOS 13 or later.
Why is my Mac screen recording silent?
The screenshot toolbar and QuickTime only record a microphone, not the sound your Mac plays. Use a recorder with system audio, or route audio through a virtual driver.
Can I record system audio on Mac without my voice?
Yes. Switch System audio on and Microphone off. You can also mute either track later in the editor.
Does recording internal audio change what I hear?
No. With Skrimo your speakers and headphones work normally while you record, and your volume keys keep working.
Related guides
How to record screen on Mac
How to record screen on Mac three ways: Shift-Command-5, QuickTime, and with internal audio using Skrimo. Clear steps, tips and fixes. Try Skrimo free.
Best screen recording software for Mac
The best screen recording software for Mac compared: Skrimo, Screen Studio, CleanShot X, Loom, Camtasia, OBS, QuickTime, Cap. Find yours, try Skrimo.
Screen Studio alternative
A free Screen Studio alternative for Mac: auto-zoom, smooth cursor, backgrounds, webcam and internal audio, with 4K export and no watermark. Try Skrimo.
Try Skrimo free
Record, auto-polish and export. No watermark, no account.